Loading...
Showing posts with label Work. Show all posts

Tuesday, 10 September 2013

// // 1 comment

Google and Its Domains

Hi,

This is the list of Google's Domains till date. Other Services and Google Product domain are not included.

Top level domain Extension Country Name
http://www.google.ad .ad  Andorra
http://www.google.ae .ae  United Arab Emirates
http://www.google.am .am  Armenia
http://www.google.as .as  American Samoa
http://www.google.at .at  Austria
http://www.google.az .az  Azerbaijan
http://www.google.ba .ba  Bosnia and Herzegovina
http://www.google.be .be  Belgium
http://www.google.bf .bf  Burkina Faso
http://www.google.bg .bg  Bulgaria
http://www.google.bi .bi  Burundi
http://www.google.bj .bj  Benin
http://www.google.bs .bs  Bahamas
http://www.google.by .by  Belarus
http://www.google.ca .ca  Canada
http://www.google.cat .cat reserved for the Catalan linguistic and cultural 
http://www.google.cd .cd  Congo, The Democratic Republic of the
http://www.google.cf .cf  Central African Republic
http://www.google.cg .cg  Congo
http://www.google.ch .ch  Switzerland
http://www.google.ci .ci  Cote d'Ivoire
http://www.google.cl .cl  Chile
http://www.google.cm .cm  Cameroon
http://www.google.cn cn  China
http://www.google.co.ao .ao  Angola
http://www.google.co.bw .bw  Botswana
http://www.google.co.ck .ck  Cook Islands
http://www.google.co.cr .cr  Costa Rica
http://www.google.co.id .id  Indonesia
http://www.google.co.il .il  Israel
http://www.google.co.in .in  India
http://www.google.co.jp .jp  Japan
http://www.google.co.ke .ke  Kenya
http://www.google.co.kr .kr  Korea, Republic of
http://www.google.co.ls .ls  Lesotho
http://www.google.co.ma .ma  Morocco
http://www.google.co.mz .mz  Mozambique
http://www.google.co.nz .nz  New Zealand
http://www.google.co.th .th  Thailand
http://www.google.co.tz .tz  Tanzania, United Republic of
http://www.google.co.ug .ug  Uganda
http://www.google.co.uk .uk  United Kingdom
http://www.google.co.uz .uz  Uzbekistan
http://www.google.co.ve .ve  Venezuela, Bolivarian Republic of
http://www.google.co.vi .vi  Virgin Islands, U.S.
http://www.google.co.za .za  South Africa
http://www.google.co.zm .zm  Zambia
http://www.google.co.zw .zw  Zimbabwe
http://www.google.com .com United States
http://www.google.com.af .af  Afghanistan
http://www.google.com.ag .ag  Antigua and Barbuda
http://www.google.com.ai .ai  Anguilla
http://www.google.com.ar .ar  Argentina
http://www.google.com.au .au  Australia
http://www.google.com.bd .bd  Bangladesh
http://www.google.com.bh .bh  Bahrain
http://www.google.com.bn .bn  Brunei Darussalam
http://www.google.com.bo .bo  Bolivia
http://www.google.com.br .br  Brazil
http://www.google.com.bz .bz  Belize
http://www.google.com.co .co Colombia
http://www.google.com.cu .cu  Cuba
http://www.google.com.cy .cy  Cyprus
http://www.google.com.do .do  Dominican Republic
http://www.google.com.ec .ec  Ecuador
http://www.google.com.eg .eg  Egypt
http://www.google.com.et .et  Ethiopia
http://www.google.com.fj .fj  Fiji
http://www.google.com.gh .gh  Ghana
http://www.google.com.gi .gi  Gibraltar
http://www.google.com.gt .gt  Guatemala
http://www.google.com.hk .hk  Hong Kong
http://www.google.com.jm .jM Jamaica
http://www.google.com.kh .kh  Cambodia
http://www.google.com.kw .kw  Kuwait
http://www.google.com.lb .lb  Lebanon
http://www.google.com.ly .ly  Libya
http://www.google.com.mt .mt  Malta
http://www.google.com.mx .mx  Mexico
http://www.google.com.my .my  Malaysia
http://www.google.com.na .na  Namibia
http://www.google.com.nf .nf  Norfolk Island
http://www.google.com.ng .ng  Nigeria
http://www.google.com.ni .ni  Nicaragua
http://www.google.com.np .np  Nepal
http://www.google.com.om .om Oman
http://www.google.com.pa .pa  Panama
http://www.google.com.pe .pe  Peru
http://www.google.com.ph .ph  Philippines
http://www.google.com.pk .pk  Pakistan
http://www.google.com.pr .pr  Puerto Rico
http://www.google.com.py .py  Paraguay
http://www.google.com.qa .qa  Qatar
http://www.google.com.sa .sa  Saudi Arabia
http://www.google.com.sb .sb  Solomon Islands
http://www.google.com.sg .sg  Singapore
http://www.google.com.sl .sl  Sierra Leone
http://www.google.com.sv .sv  El Salvador
http://www.google.com.tj .tj  Tajikistan
http://www.google.com.tr .tr  Turkey
http://www.google.com.tw .tw  Taiwan, Province of China
http://www.google.com.ua .ua  Ukraine
http://www.google.com.uy .uy  Uruguay
http://www.google.com.vc .vc  Saint Vincent and the Grenadines
http://www.google.com.vn .vn  Viet Nam
http://www.google.cv .cv  Cape Verde
http://www.google.cz .cz  Czech Republic
http://www.google.de .de  Germany
http://www.google.dj .dj  Djibouti
http://www.google.dk .dk  Denmark
http://www.google.dm .d  Dominica
http://www.google.dz .dz  Algeria
http://www.google.ee .ee  Estonia
http://www.google.es .es  Spain
http://www.google.fi .fi  Finland
http://www.google.fm .f  Micronesia
http://www.google.fr .fr  France
http://www.google.ga .ga  Gabon
http://www.google.ge .ge  Georgia
http://www.google.gg .gg  Guersney
http://www.google.gl .gl  Greenland
http://www.google.gm .gm Gambia
http://www.google.gp .gp  Guadeloupe
http://www.google.gr .gr  Greece
http://www.google.gy .gy  Guyana
http://www.google.hn .hn  Honduras
http://www.google.hr .hr  Croatia
http://www.google.ht .ht  Haiti
http://www.google.hu .hu  Hungary
http://www.google.ie .ie  Ireland
http://www.google.im .im Isle of Man
http://www.google.iq .iq  Iraq
http://www.google.is .is  Iceland
http://www.google.it .it  Italy
http://www.google.je .je  Jersey
http://www.google.jo .jo  Jordan
http://www.google.kg .kg  Kyrgyzstan
http://www.google.ki .ki  Kiribati
http://www.google.kz .kz  Kazakhstan
http://www.google.la .la  Lao People\'s Democratic Republic
http://www.google.li .li  Liechtenstein
http://www.google.lk .lk  Sri Lanka
http://www.google.lt .lt  Lithuania
http://www.google.lu .lu  Luxembourg
http://www.google.lv .lv  Latvia
http://www.google.md .md  Moldova, Republic of
http://www.google.me .me  Montenegro
http://www.google.mg .mg  Madagascar
http://www.google.mk .mk  Macedonia, The Former Yugoslav Republic of\nspons
http://www.google.ml .ml  Mali
http://www.google.mn .mn  Mongolia
http://www.google.ms .ms  Montserrat
http://www.google.mu .mu  Mauritius
http://www.google.mv .mv  Maldives
http://www.google.mw .mw  Malawi
http://www.google.ne .ne  Niger
http://www.google.nl .nl  Netherlands
http://www.google.no .no  Norway
http://www.google.nr .nr  Nauru
http://www.google.nu .nu  Niue
http://www.google.pl .pl  Poland
http://www.google.pn .pn  Pitcairn
http://www.google.ps .ps  Palestinian Territory, Occupied
http://www.google.pt .pt  Portugal
http://www.google.ro .ro  Romania
http://www.google.rs .rs  Serbia
http://www.google.ru .ru  Russia
http://www.google.rw .rw  Rwanda
http://www.google.sc .sc  Seychelles
http://www.google.se .se  Sweden
http://www.google.sh .sh  Saint Helena
http://www.google.si .si  Slovenia
http://www.google.sk .sk  Slovakia
http://www.google.sm .sm San Marino
http://www.google.sn .sn  Senegal
http://www.google.so .so  Somalia
http://www.google.st .st  Sao Tome and Principe
http://www.google.td .td  Chad
http://www.google.tg .tg  Togo
http://www.google.tk .tk  Tokelau
http://www.google.tl .tl  Timor-Leste
http://www.google.tm .tm Turkmenistan
http://www.google.tn .tn  Tunisia
http://www.google.to .to  Tonga
http://www.google.tt .tt  Trinidad and Tobago
http://www.google.vg .vg  Virgin Islands, British
http://www.google.vu .vu  Vanuatu
http://www.google.ws .ws  Samoa

Source: Internet

Enjoy and increase your knowledge.
All the Best.
Read More

Friday, 6 September 2013

// // Leave a Comment

Creating New File and Folder in MS-DOS

Hi,

This is another Tutorials in MS-DOS Series. In this post, we will learn to Create a new file and folder using DOS System. Before this, I would like to introduce you with Command Prompt.
Prompt means “Assist by suggesting the next words of something forgotten or imperfectly learned.” MS DOS prompt also help you and interfaces with you.

In above line C: (colon) is current drive , \ (backslash) is symbol for directory (folder), Users is directory name, \ (backslash) is directory symbol, John is name of folder and > (greater than) is command prompt symbol. This is the place, where you will write command.
1. How to create a File?

Use following commands to create a file in MS-DOS command prompt.

copy con filename ↵

Hi, My name is John. You are learning how to create a file in DOS mode.

^Z ↵
Meaning of above commands.

copy con – This command is used for creating new file.

↵ – This is Enter key. This executes command typed in prompt.

Hi,.. .. .. in DOS mode. – This is text of your file.

^Z ↵ – This is Ctrl+Z key. This saves current file. Alternate for this is F6 key.

2. How to create Folder?

Use following commands to create a folder (directory) in MS-DOS command prompt.

md foldername ↵

or

mkdir foldername ↵
Meanings of Above Command:


md or mkdir – Make Directory

↵ – Enter Key to execute command.
Will be back with more on MS-DOS Series. Till then, you can add me on Google+ at +John Bhatt 
Read More
// // Leave a Comment

Component files of MS-DOS

Hi,

I am back after so long on my Tutorial Series. This is about MS-DOS.

We left at Introduction of Commands, today we will continue with File System of MS-DOS.

DOS is created using following files. IO.SYS, MSDOS.SYS, COMMAND.COM, AUTOEXE.BAT.
These files are created for special purpose like booting, creating and coordinating with devices for input, output  and saving internal commands of DOS in memory.
In other words these are program files which are created which creating DOS. You will get brief introduction to these files on next page.


  1. IO.SYS & MSDOS.SYS: These both files are hidden files. These are system files and are present on every disc. At the time of booting both of these Files are automatically get saved in Temporary Memory. IO.sys stores the standard operation related to input and output devices. And MSDOS.sys file stores command that contact with operating system.

  1. COMMAND.COM : This is a command interpreter file in MS-DOS which is a group of IO.sys, MSDOS.sys and COMMAND.COM. At the time of booting of computer, all these three files are automatically saved in the memory. COMMAND.COM file contains all the definitions of Internal command and programs of these commands. This file is mainly responsible for executing command which are typed by user in command prompt.. 

  1. AUTOEXE.BAT: After booting Operating System it looks for AUTOEXE.BAT file in the disc and executes it. This process is repeated when computer is switched on. It is a batch file which contains MS-DOS command like a program file and it automatically executes the command written in it. Therefore it is named AUTOEXE.BAT which means self executable batch file.

On next post, I will be talking about creating a File in MS-DOS and Making New Directory (folder).

Till then, you can add me to Google+ at +John Bhatt 

Read More

Wednesday, 28 August 2013

// // Leave a Comment

Contineous Increase in Rate of US Dollar - A Letter to Rabindra Mishra

Hi,

This is a complete copy of Online Letter submitted to Mr Rabindra Mishra, reputed Social Activist and Media Person regarding the sharing of some message to youth of Nepal for consuming Local and Home Product brands instead of using Exported and Branded foreign consumer applications.

रबिन्द्र सर्,

तपाइका अनेक राम्रा कार्य र सकारात्मक विचार का अनुयायीहरु म लगायत संसारभरी थुप्रै छन्|

मेरो एउटा निवेदन: तपाई ले आफ्नो पेजमा सम्पूर्ण साथीहरुलाइ स्वदेसी उत्पादन को प्रयोग गर्न प्रेरित गरीदिनु भएमा देशको आर्थिकस्तर बिदेसी मुद्रा को तुलनामा केहि सुधार हुने थियो कि? मेरो विचारमा आजकलका युवाहरु Imported र Branded वस्तुको प्रदर्शनी को होडबाजीमा आफ्नो देशको आर्थिकस्तर घटाइरहेका र राजनितिक कारण भन्दै समय बर्बाद गरिराखेको देखिन्छ |

मैले हालैको समयमा एउटा Community Website मा प्रकासित भएको एउटा लेख पढेको थिए| त्यो मलाई एकदमै घतलाग्दो र समयसान्दर्भिक बिषय भएकोले सम्पूर्ण नेपाली युवाहरु माझ सेयर गर्नुपर्छ भन्ने लाग्यो | तर Facebook मा थोरै मात्र साथी सम्म पहुच भएको र कमै मात्र Active हुने भएकाले, तपाई ले आफ्नो पेज मार्फत साथीहरु सम्म मेरो सन्देस पुराइदिनु होला कि भन्ने आशा राखेको छु |

पृथ्वी राज भट्ट
झलारी, कंचनपुर
(हाल: गुडगाव, भारत)

I will be publishing more points, what we can do to Increase the value of our currency in future posts. Keep visiting.

You can add me on Google+ at +John Bhatt 
Read More

Saturday, 27 July 2013

// // Leave a Comment

Maintenance Complete in Download Center

Hi,

We have finished migrating all thing from Previous Host to New Host. Download Center is expected to Work as same as previous days. Accounts registered with our website has been kept same and you can log in with earlier credential. Other URLs and Bookmarks you added will also remain same and working.


However, Live FM's will be down for some more hours. We are working and collecting more reliable sources of stream. Once it will be done, we will notify you here.

You can keep in touch by Adding us on Facebook page, Just hit Like and Click Show in Feed link which will appear on hovering Like Button. You can also subscribe to new songs on Download Center  via Feedburner Service by Google. Google will drop you a mail once New Song is available on Download Center.

We have shifted to Higher Configuration and Dedicated Server without any Limitations, So Website is expected to load in less time and other resources also.

Till then, enjoy New songs in Download Center and have fun.


Regards,
+John Bhatt & Team
P.Yar.B Complex
Read More

Friday, 26 July 2013

// // Leave a Comment

Maintenance in Download Center

Hello Everyone!

Due to some serious Errors, I need to take Website Down. I am changing Host and Migrating Files and Databases so that there will be no difficulties while accessing and browsing.


Will be back soon.

Thanks for your patience.

John Bhatt
P.Yar.B Complex

Read More

Saturday, 6 July 2013

// // Leave a Comment

New and Re-Designed Download Center

Hello Friends!

We have recently worked on Download Center and updated its Layout to a Neat & Clean HTML5, CSS3 and Responsive design.
It will look different while visiting from Different Platform and with Robust Speed. We would like to thank you all for your patient and support during the Downtime of Website.

Download Center is a place where you can download your favorite Nepali Song with One Click and without any Fee or Registration.

Screenshot on PC (Taken with Internet Explorer 11)

Screen Taken on a Mobile Device
Screenshot Taken on a Tablet Device

However, if you feel any kind of Problem while browsing the Website or Any Feature suggestion, you can write to us back through Comment.

Till then you can add me on Google+, my profile is +John Bhatt .
All the Best.
Read More

Thursday, 23 May 2013

// // Leave a Comment

New Version of Srijan Shiksha Website

Hi Friends,

We have recently modified the Core of Srijan Shiksha Website. Now it is an example of Best Websites of Organizations. Please have a look at below link.

http://www.srijanshiksha.com/

This is completely responsive website for Different Platforms. We expect it to display well and Fit on every platform.

Desktop Browser View is as below:


Android Browser:

Have a look and give feedback. We will be waiting to hear from you.

Till then you can add me on Google+, My profile is +John Bhatt 

Read More

Sunday, 21 April 2013

// // Leave a Comment

New Year Gift

Hey Friends,

I still remember those days, honestly and clearly speaking, starting days of my Internet Experience. I have some knowledge of Website Designing. I have learn HTML at Modern Computer Education before heading towards India approximately for 2-3 months. I use to read a book by Hemanta Baral named Manuals for  Masters In Computer Application,
While I have started to learn about the Web Technology, one of Marketing Company Reserved this Domain and offered me for the cost of 1500 USD. I was definitely not in position to grab the offer. So Finally on the First Day of Year 2070, I registered my Nick Name as Website. Now Live at www.pyarb.com.

Happy New Year 2070....

Meanwhile, you can connect me on Google+ and My Profile is +John Bhatt and You can Find Hemanta sir at +Hemanta Baral.
Read More

Saturday, 13 April 2013

// // Leave a Comment

Happy New Year BS 2070


Happy New Year BS 2070 to all of you....
Read More

Thursday, 24 January 2013

// // 9 comments

Opening a Bank Account in India for Nepalese Citizen

Hi,

Today, I am going to tell you some different thing. This is not related to Technology but it is related to your Social Life. As a known fact, most of Nepalese People are working in India in various industries including from home workers to Higher Level Management of private companies.


Some of us are here to earn some money, some are studying and some people are used to India and started their own business. We need to send money to Nepal for our relatives (home) or for friends, This is a normal procedure and task.

You just need to have some of the documents. Documents required for opening an account are as below:

  1. Passport or VISA Issued by Nepal Government.
  2. Citizenship card issued by Any District of Nepal
  3. Proof of Address (In India).
  4. Passport Size Photographs.

Details of the documents.

  1. Citizenship Card: Below is attached a sample Citizen ship card. 

  2. 2. Proof of Address: You need to submit a valid address proof while asked by Bank. Such, Address proof includes, Rent Aggrement between your House Owner and you. Telephone or Electricity Bill in your name,  Employment Letter issued by a Valid Company, and other documents as per Satisfaction to Officer who is responsible for opening an Account.
  3. Photographs: 3-4 Passport size Photographs taken in recent time.
  4. VISA or Passport: If you have VISA or PASSPORT issued by Nepal Government, you need not to have Citizenship card.

Steps to open an account.

If you do have Passport or VISA.
Just go to Nearest Branch of Any Bank. Fill the Form and submit your documents as mentioned above. Deposit minimum amount for your account as per instruction of officer. This Amount is INR 500.00 for Rural Areas and INR 1000.00 for Semi Urban, Urban and Metro regions of Government Sector Banks like, State Bank of India, Punjab National Bank, etc. While this amount is INR 2500.00 for Rural Area, INR 5000.00 for Semi Urban and INR 10000.00for Urban and Metros of Private Sector Bank like, ICICI Bank, HDFC Bank, Axix Bank etc.

If you do not have Passport or VISA.
You need to attest your Citizenship card in case you do not have Any International ID Card (VISA or PASSPORT). Citizenship card is taken as National ID Proof.

Steps to Attest your Citizenship Card.

The one and only authority to attest your Citizenship card is the Embassy of Nepal. Embassy of Nepal is located in Central New Delhi and Map is below Embedded. 


If you are going through Metro,Nearest Metro is Mandi House Metro. Office is closed on Saturday and Sunday. Go and write an Application for attesting your Citizenship.

Sample of Application

To,
The Ambassador,
Nepal Embassy, New Delhi,

Subject: Verification of Citizenship Card

Dear Sir,

I am, .........................., resident of  Nepal having permanent address of, ............... village, .............. VDC, ward No. ......... , District ............................, Zone .....................
I am working/studing in India and need to open an Bank Account. You are requested to kindly attest and issue an ID proof. My Original Citizenship card is attached herewith.

Sincerely,
......................
........................... (Local Address)

Write application in above format and submit with your Original Citizenship card, Photocopy of Citizenship card and submit. Once you submitted the document and application, It will be attested and notified to you within 30 minutes (may take longer).
You need to pay INR 125.00 and they will give you a Letter on Letter Head of Embassy of Nepal with their stamp.
A Sample is attached below.

Now, you just need to go to bank, Submit your Letter from Embassy, photocopy of Citizenship, Address Proof and photographs.

Congratulations, if you followed these steps, you will surely get an Account opened with your ID Proofs from your own Nation. Don't support fake agents that promise to make you Voter ID Card, Rasan Card or any other Indian Identity Proof. This is illegal.

You can add me to your Circle +John Bhatt .
Read More

Monday, 5 November 2012

// // Leave a Comment

Run Commands Listed In Alphabetical Order

Hi,
Here are the Run Commands for Windows Operating System listed in Alphabetic Order.


Program
Run Command
Accessibility Controls
access.cpl
Accessibility Wizard
accwiz
Add Hardware Wizard
hdwwiz.cpl
Add/Remove Programs
appwiz.cpl
Administrative Tools
control admintools
Adobe Acrobat ( if installed )
acrobat
Adobe Distiller ( if installed )
acrodist
Adobe ImageReady ( if installed )
imageready
Adobe Photoshop ( if installed )
photoshop
Automatic Updates
wuaucpl.cpl
Basic Media Player
mplay32
Bluetooth Transfer Wizard
fsquirt
Calculator
calc
Ccleaner ( if installed )
ccleaner
C: Drive
c:
Certificate Manager
cdrtmgr.msc
Character Map
charmap
Check Disk Utility
chkdsk
Clipboard Viewer
clipbrd
Command Prompt
cmd
Command Prompt
command
Component Services
dcomcnfg
Computer Management
compmgmt.msc
Compare Files
comp
Control Panel
control
Create a shared folder Wizard
shrpubw
Date and Time Properties
timedate.cpl
DDE Shares
ddeshare
Device Manager
devmgmt.msc
Direct X Control Panel ( if installed )
directx.cpl
Direct X Troubleshooter
dxdiag
Disk Cleanup Utility
cleanmgr
Disk Defragment
dfrg.msc
Disk Partition Manager
diskmgmt.msc
Display Properties
control desktop
Display Properties
desk.cpl
Display Properties (w/Appearance Tab Preselected )
control color
Dr. Watson System Troubleshooting Utility
drwtsn32
Driver Verifier Utility
verifier
Ethereal ( if installed )
ethereal
Event Viewer
eventvwr.msc
Files and Settings Transfer Tool
migwiz
File Signature Verification Tool
sigverif
Findfast
findfast.cpl
Firefox
firefox
Folders Properties
control folders
Fonts
fonts
Fonts Folder
fonts
Free Cell Card Game
freecell
Game Controllers
joy.cpl
Group Policy Editor ( xp pro )
gpedit.msc
Hearts Card Game
mshearts
Help and Support
helpctr
Hyperterminal
hypertrm
Hotline Client
hotlineclient
Iexpress Wizard
iexpress
Indexing Service
ciadv.msc
Internet Connection Wizard
icwonn1
Internet Properties
inetcpl.cpl
Internet Setup Wizard
inetwiz
IP Configuration (Display Connection Configuration)
ipconfig /all
IP Configuration (Display DNS Cache Contents)
ipconfig /displaydns
IP Configuration (Delete DNS Cache Contents)
ipconfig /flushdns
IP Configuration (Release All Connections)
ipconfig /release
IP Configuration (Renew All Connections)
ipconfig /renew
IP Configuration (Refreshes DHCP & Re-Registers DNS)
ipconfig /registerdns
IP Configuration (Display DHCP Class ID)
ipconfig /showclassid
IP Configuration (Modifies DHCP Class ID)
ipconfig /setclassid
Java Control Panel ( if installed )
jpicpl32.cpl
Java Control Panel ( if installed )
javaws
Keyboard Properties
control keyboard
Local Security Settings
secpol.msc
Local Users and Groups
lusrmgr.msc
Logs You Out of Windows
logoff
Malicious Software Removal Tool
mrt
Microsoft Access ( if installed )
access.cpl
Microsoft Chat
winchat
Microsoft Excel ( if installed )
excel
Microsoft Diskpart
diskpart
Microsoft Frontpage ( if installed )
frontpg
Microsoft Movie Maker
moviemk
Microsoft Management Console
mmc
Microsoft Narrator
narrator
Microsoft Paint
mspaint
Microsoft Powerpoint
powerpnt
Microsoft Word ( if installed )
winword
Microsoft Syncronization Tool
mobsync
Minesweeper Game
winmine
Mouse Properties
control mouse
Mouse Properties
main.cpl
MS-Dos Editor
edit
MS-Dos FTP
ftp

Remaining commands on next post.
Drop a comment below to reach me or provide feedback on above post.

Happy to Help. 
Glad to Be,
John Bhatt
Read More

Saturday, 20 October 2012

// // 2 comments

List All SQL Server Instances in Combo (Windows Form) - Part-2

Hello Friends,
On the Previous Post on this series, I have told you the code and procedure upto Connect Button. Hope you have been through it and enjoyed that. If not, please read below post before moving ahead. http://www.prithviraj.com.np/2012/10/list-all-sql-server-instances-in-combo_9.html
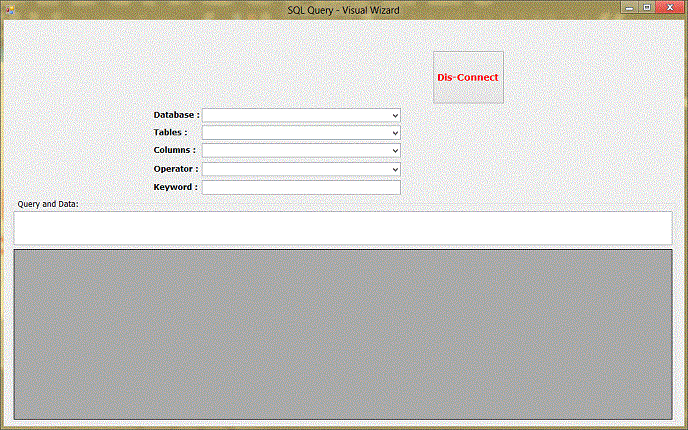
Today, I am going to share rest of the Code for Listing Database, Tables Inside Database and Columns and apply them with Operator and simply perform Select Operation from database and list the Result in DataGrid. Let's look the Design you have previously saw when making connection.


In above design,
In Database Combo, we will list all database from Connected Server. Then in Table Combo, we will list all Tables of Selected Database and in Column Combo all columns of Selected Table.

Lets Begin the Code. On Button Click and Successful Connection, we will load all database names in Database Combo. Actually we have did it earlier.
Lets have look at this Code:
comboBox2.Items.Clear();
if (checkBox1.Checked == true)
{
ConStr = "Data Source = " + comboBox1.Text.ToString() + ";Integrated Security = true;";
}
else
{
ConStr = "Data Source = " + comboBox1.Text.ToString() + ";UID=" + textBox1.Text + ";pwd=" + textBox2.Text + ";";
}
SqlConnection Conexion = new SqlConnection(ConStr);
Conexion.Open();
label9.Visible = false;
panel2.Visible = false;
button2.Visible = true;
panel1.Visible = true;
groupBox1.Visible = true;
DataTable tblDatabases = Conexion.GetSchema("Databases");

for (int i = 0; i <= tblDatabases.Rows.Count - 1; i++)
{
comboBox2.Items.Add(tblDatabases.Rows[i][0].ToString());
}
Conexion.Close();

This is code from earlier post.
Now Lets see the Code on SelectedIndex Change event of Database Combo (Combobox2).
private void comboBox2_SelectedIndexChanged(object sender, EventArgs e)
{
comboBox3.Items.Clear();
SqlConnection conx = new SqlConnection(ConStr + "Database ="+comboBox2.Text.ToString()+";");
conx.Open();
DataTable tblTables = conx.GetSchema("Tables");
for (int i = 0; i <= tblTables.Rows.Count - 1; i++)
{
comboBox3.Items.Add(tblTables.Rows[i][2].ToString());
}
conx.Close();
}
Here we are creating Connection String Everytime, because, It is changing every-time. Now this code will list all the Tables inside Database in Table Combo (combobox3): Code:
private void comboBox3_SelectedIndexChanged(object sender, EventArgs e)
{
comboBox4.Items.Clear();
SqlConnection conx = new SqlConnection(ConStr + "Database =" + comboBox2.Text.ToString() + ";");
conx.Open();
string tableName = comboBox3.SelectedItem.ToString();
SqlDataAdapter adp = new SqlDataAdapter("select * from INFORMATION_SCHEMA.COLUMNS where TABLE_NAME = '"+comboBox3.SelectedItem.ToString()+"'",conx);
DataTable tblColumns = new DataTable();
adp.Fill(tblColumns);
for (int i = 0; i <= tblColumns.Rows.Count - 1; i++)
{
comboBox4.Items.Add(tblColumns.Rows[i][3].ToString());
}
conx.Close();
}

Now above code will make all Columns of Selected table from database.
Now Directly move to Keyword TextBox textchange event which will load data as you type.
private void textBox3_TextChanged(object sender, EventArgs e)
{
string QueryCon = ConStr;
if (comboBox5.Text.ToString() == "like")
{
QueryStr = "SELECT * FROM " + comboBox3.Text.ToString() + " WHERE " + comboBox4.Text.ToString() + " " + comboBox5.Text.ToString() + " '%" + textBox3.Text + "%'";
}
else
{
QueryStr = "SELECT * FROM " + comboBox3.Text.ToString() + " WHERE " + comboBox4.Text.ToString() + " " + comboBox5.Text.ToString() + " '" + textBox3.Text + "'";
}
TxtQueryBox.Text = ConStr + "Database=" + comboBox2.Text.ToString() + ";"+"\n" + QueryStr;
SqlDataAdapter adp = new SqlDataAdapter(QueryStr, ConStr+"Database="+comboBox2.Text.ToString()+";");
DataSet ds = new DataSet();
adp.Fill(ds);
dataGridView1.DataSource = ds.Tables[0];
}

This will load data in GridView automatically. Lets see a snapshot once again with Result.
All the Best, Enjoy....
Read More

Tuesday, 9 October 2012

// // 1 comment

List All SQL Server Instances in Combo (Windows Form)


Hi,

I was checking my Old Projects and Like to share a simple example with. Why not to create a SQL Management Application.

How we would do this? What is our objective?

Lets be clear.
We will List All SQL Server Instances available in Network into Application.
Then We will connect to Server using Windows Authentication or SQL Server Authentication.
After successfull authentication ,
We will list all databases in Instance.
After Database, we will List All Tables in Database,
After Database , we will list All Columns in Selected table.
We will place a Create button next to Database, Table list box also.
After selecting a Column, we provided a Filter (operator) and parameters in box.
Which will fetch data and display in DataGridView.

First we Designed a Following Screen.


In Servers List we have to Load All List of Servers and Connect. We have Options for Username and Password and also a Checkbox for Integrated Security (Windows Authentication).
Lets See the Code in Form Load.
Namespace to Include:

using System.Data.Sql;
using System.Data.SqlClient;

Now Form_Load Event Code

private void Form1_Load(object sender, EventArgs e)
{
panel1.Visible = false;
groupBox1.Visible = false;
label9.Visible = true;
label9.TextAlign = ContentAlignment.MiddleCenter;
SqlDataSourceEnumerator SerInstances = SqlDataSourceEnumerator.Instance;
DataTable SerNames = SerInstances.GetDataSources();
for (int i = 0; i <= SerNames.Rows.Count - 1; i++)
{
comboBox1.Items.Add(SerNames.Rows[i][0].ToString()+"\\"+SerNames.Rows[i][1].ToString());
}
}

Description of Above Code: We have placed rest design in Panel and Groupbox so we set that invisible on Form Load. Please Make a Conncetion First.. is Label9 and we set is Visible and aligned. Now main task is to List Sql Servers on Network. For this we used SqlDataSourceEnumerator class. In Next Line we take a DataTable and stored ServerInstances into that. Rest is Simple, We added all items into Listbox. Column 0 contains Machine name and Column 1 contains Instance Name. So we combined that at the Time of Adding to ComboBox Control. Now Click the Connect Button:

private void button1_Click(object sender, EventArgs e)
{
if (checkBox1.Checked == true && textBox1.Text.Trim().Length > 0)
{
MessageBox.Show("Please Uncheck Integrated Security or Clear UserName!", this.Text + " - Error", MessageBoxButtons.OK, MessageBoxIcon.Error);
}
else if (checkBox1.Checked == false && textBox1.Text.Trim().Length == 0)
{
MessageBox.Show("Please Check Integrated Security or Enter UserName!", this.Text + " - Error", MessageBoxButtons.OK, MessageBoxIcon.Error);
}

else if (textBox1.Text.Trim().Length > 0 && textBox2.Text.Trim().Length == 0)
{
errorProvider1.SetError(textBox2, "Please enter password for Username = " + textBox1.Text + "!");
}
else if (comboBox1.Text.Trim().Length == 0)
{
MessageBox.Show("Please select Server from List. If You can not see any Instance in Servers Combobox, Contact your Network Administrator!", this.Text + " - Message", MessageBoxButtons.OK, MessageBoxIcon.Asterisk);
}
else
{
errorProvider1.Clear();
if (MessageBox.Show("Connection Successfull!, You are Now Connected to Server: " + comboBox1.Text.ToString() + "!", this.Text + " - Alert", MessageBoxButtons.OK, MessageBoxIcon.Information) == DialogResult.OK)
{
comboBox2.Items.Clear();
if (checkBox1.Checked == true)
{
ConStr = "Data Source = " + comboBox1.Text.ToString() + ";Integrated Security = true;";
}
else
{
ConStr = "Data Source = " + comboBox1.Text.ToString() + ";UID=" + textBox1.Text + ";pwd=" + textBox2.Text + ";";
}
SqlConnection Conexion = new SqlConnection(ConStr);
Conexion.Open();
label9.Visible = false;
panel2.Visible = false;
button2.Visible = true;
panel1.Visible = true;
groupBox1.Visible = true;
DataTable tblDatabases = Conexion.GetSchema("Databases");

for (int i = 0; i <= tblDatabases.Rows.Count - 1; i++)
{
comboBox2.Items.Add(tblDatabases.Rows[i][0].ToString());
}
Conexion.Close();
}
}
}

Description of Code: We Put some Validation and Message box to make some user friendly environment. After getting Proper Username and password, we make a Connection String and Used Username and password in Connection String. We build a connection, Make Servers List, Username and password and Connect button invisible and Disconnect button Visible. Then First we loaded all Databases of Selected Instance using Connection.GetSchema() method. How it look after connecting.


For now, its your turn to code something for this. I'll be back soon with Rest Part of This Program. Comments are Welcome. Feedback keep the Important Role in Improvement. So Expecting those from you. Happy Learning!

John Bhatt
Glad to Know, Free to Share.....
Read More

Tuesday, 18 September 2012

// // Leave a Comment

File Upload Control with File Type Filter

Hi,

We are going to learn how to upload a File using FileUpload Control in ASP.NET.

ASPX Code

We Placed a FileUpload Control and a button to Click.

<asp:FileUpload ID="FileUpload1" runat="server" />
<asp:Button ID="BtnUpload" runat="server" Text="Upload File" onclick="BtnUpload_Click" />

Back-end Code

Now BtnUpload_Click event in .cs page.
We are going to Upload only Picture (.JPG file or .BMP file).
 
protected void BtnUpload_Click(object sender, EventArgs e)
{
string sSiteFolder = "ResumeFolder";
string sRealPath = Server.MapPath(sSiteFolder);
if (!Directory.Exists(sRealPath))
Directory.CreateDirectory(sRealPath);
string CompletePath = sRealPath + FileUpload1.FileName;
string FileExt = CompletePath.Substring(CompletePath.IndexOf("."));
switch (FileExt)
{
case ".jpg":
FileUpload1.SaveAs(sRealPath + FileUpload1.FileName);
break;
case ".JPG":
FileUpload1.SaveAs(sRealPath + FileUpload1.FileName);
break;
case ".bmp":
FileUpload1.SaveAs(sRealPath + FileUpload1.FileName);
break;
case ".BMP":
FileUpload1.SaveAs(sRealPath + FileUpload1.FileName);
break;
}
}
Enjoy...
John Bhatt
Read More

Sunday, 16 September 2012

// // Leave a Comment

Support Help Nepal Network by Facebook.

Facebook....
A method to Pass Time and in its language utility to connect with World. There are more accounts on Facebook than the Polulation of Earth.

Friends, some one is willing to do good work using Facebook. You should support. Just one click to Support a will to do for the Nation. I think every body wants to do something for his nation. Its time to do something.

Lets Vote for Help Nepal Network on Chase Community Giving's Polling Competition.

http://apps.facebook.com/chasecommunitygiving/charity/view/ein/51-0496452


Like application. and Vote.
Read More

Thursday, 6 September 2012

// // 1 comment

Rich Text Editor with ASP.NET


Introduction


As we know, ASP.NET lack a Control, that we need most, RichText Editor. 

If you are trying to create a application or website with Admin Panel or Blog or Forum Website or something such project for Web in ASP.NET platform, we need RickText Editor. 

To overcome from this, we can use Many open source JavaScript based editors, like Tiny MCE, FCKEditor, etc.

Content:

In this Article, we would learn how to Implement Free RichText Editor into ASP.NET website. We are using TinyMCE editor here.

We are using TinyMCE, which is One of most popular and Open Source project. Download latest version of TinyMCE from Download Page, and Extract the Zip File.


Browse the Extracted Location and go to ..\tinymce_3.5.6\tinymce\jscripts folder.

Now Copy the tinymce folder from above Location to your Solution in Visual Studio.


Add a Page where you want to Implement RichTextbox and Design the Page.


Now lets Move to Topic. How to Add TinyMCE in Page and Richtext box Control placed for Content of Blog in above sample.

Insert JavaScript file tiny_mce.js in Web Page and some also initialize this function.

This Code into head Section.

 
<script type="text/javascript" src="tiny_mce/tiny_mce.js"></script>
<script type="text/javascript" language="javascript">
tinyMCE.init({
// General options
mode: "textareas",
theme: "advanced",
plugins: "pagebreak,style,layer,table,save,advhr,advimage,advlink,emotions,iespell,inlinepopups",
});
</script>
Note: You can so many settings, look in Samples and Help Doc of TinyMCE.

Now Run the Page. Look, how it looked.


Without any additional Practice, our TextBox with Multiline turned into RichText Editor.

Now, its ok as per Requirement. No, when you will send Command to Server, it will return Error Like below.


We have to add just One Line of Code in Web.config file and one property in Default.aspx form (Page with Rich Text Editor).

That is : 

in web.config:

<configuration>
<system.web>
<compilation debug="true" targetFramework="4.0"/>
<httpRuntime requestValidationMode="2.0"/>
</system.web>
</configuration>

and in Page directive:

ValidateRequest = "false"

<%@ Page Language="C#" AutoEventWireup="true" CodeFile="Default.aspx.cs" Inherits="_Default" ValidateRequest="false" %>

Now, you can save the Data in Database, Do postback, retrieve same in Rich Text box and do anything you want.

Conclusion


IT is Jugad. So enything is possible here. Don't be worry about things that are not available. Just modify and make use of things those are available. Tiny MCE is one of the most known and Popular Rich Text editor (WYSIWYG).

You can find many more articles written by me on Dotnetspider also. Have a look at them.
You can add me to your Circle on Google+ at +John Bhatt

Hope this will be helpful to you. 
Read More

Friday, 13 July 2012

// // Leave a Comment

4 Years of Being Far From Family

Today,
I am going to write a blog about me, It's neither about Tech nor any other Courses. Its personal.


On the 13th of July 2008, I left my family to work. I've just gave Exams of +2 and worried about Exams. So I decided to go to India and do some job between the time period of Exams and Results. I have done a Basic Computer Course called SOP (Smart Office Professional) from UNIT-IT, then I did a crash course from Modern Computer Institute which took about 2 months.


When I left home, I expected a Basic average salary (about 5K INR), working with Computers, a Good office and blah blah...


I, a friend from Village Jagdish and my and Brother (in family relations) left home at the afternoon of 13th July which I still remember. Next Day morning , 14th July 2008, I was working with a Transportation Company named BEST ROADWAYS LIMITED. I was First time in India for permanent living and directly in Haryana. The Language of Haryana is some hard to hear and direct hits ear (but they are really nice). Slowly slowly I adjusted myself with atmosphere.
....
.....
.......


Now Summary of things what I think I got after leaving home.


  1. Experience of Work / Job.
  2. Completed my +2
  3. Pursuing Graduation
  4. DOEACC 'A' Level
  5. .NET Training / Web Development & Design
  6. Wide Experience in Computer Programming
  7. Some Good Friends
  8. Deep Introduction of Human Nature at Job.
  9. And Most Important.- A Loving and Caring Family 
My biggest earning which  I think is faith and believe of some people which can never be bought.

I can not describe the Joy of listening these Words. 'परदेश में होकर भी अपने  परिवार से ज्यादा प्यार करने वाले परिवार पाने वाले तुम्हे देखकर मुझे जलन होती है | '.

Read More

Wednesday, 11 July 2012

// // Leave a Comment

Thanks and Congratulations....

Just Got the 10,000th Visitor to make my blog hits..

Many many Thanks and Congratulations......
Read More

Thursday, 5 July 2012

// // Leave a Comment

AutoCompleteExtender in Textbox

Hi,

We will learn how to enable AutoCompleteExtender in Textbox Control.


Here, We will learn to Map data from SQL Database to Textbox within Same Page. WebMethod in .cs Page.

Directly to Code:
ASPX Page Code


Vehicle No :


Now Code in ASPX.CS Page

Add these Namespages for below Code.
using System.Data; // For Dataset
using System.Data.SqlClient; // For SQlConnection/Adaptor
using System.Configuration; // Access Consting from Web.Config.
using System.Collections.Generic;


[System.Web.Services.WebMethodAttribute(), System.Web.Script.Services.ScriptMethodAttribute()]
public static string[] GetVehicleList(string prefixText, int count, string contextKey)
{
SqlConnection con = new SqlConnection(ConfigurationManager.ConnectionStrings["ConToJohn"].ConnectionString);
SqlDataAdapter adp = new SqlDataAdapter("Select distinct VehicleNo from VehicleDispatch where VehicleNo like '%" + prefixText + "%'", con);
DataSet ds = new DataSet();
adp.Fill(ds, "Vehicles");
string[] VehicleNo = new string[ds.Tables["Vehicles"].Rows.Count];
for (int i = 0; i <= ds.Tables["Vehicles"].Rows.Count - 1; i++)
{
VehicleNo.SetValue(ds.Tables["Vehicles"].Rows[0][0].ToString(), i);
}
return VehicleNo;
}
I have Selected Only Unique Value from Database using SELECT DISTINCT .... command. If you want all records, Simply Change SQL Query to SELECT ..... Will be glad to hear from you... This Post is copied from DotNetFunda where I wrote in Code section.
Read More