Loading...
Showing posts with label C-Sharp. Show all posts

Saturday, 20 October 2012

// // 2 comments

List All SQL Server Instances in Combo (Windows Form) - Part-2

Hello Friends,
On the Previous Post on this series, I have told you the code and procedure upto Connect Button. Hope you have been through it and enjoyed that. If not, please read below post before moving ahead. http://www.prithviraj.com.np/2012/10/list-all-sql-server-instances-in-combo_9.html
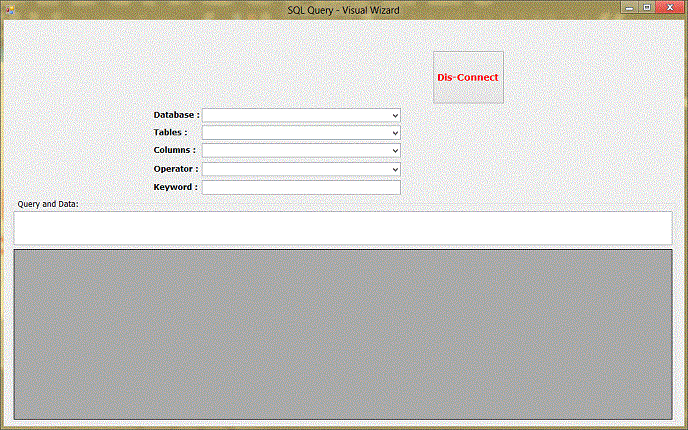
Today, I am going to share rest of the Code for Listing Database, Tables Inside Database and Columns and apply them with Operator and simply perform Select Operation from database and list the Result in DataGrid. Let's look the Design you have previously saw when making connection.


In above design,
In Database Combo, we will list all database from Connected Server. Then in Table Combo, we will list all Tables of Selected Database and in Column Combo all columns of Selected Table.

Lets Begin the Code. On Button Click and Successful Connection, we will load all database names in Database Combo. Actually we have did it earlier.
Lets have look at this Code:
comboBox2.Items.Clear();
if (checkBox1.Checked == true)
{
ConStr = "Data Source = " + comboBox1.Text.ToString() + ";Integrated Security = true;";
}
else
{
ConStr = "Data Source = " + comboBox1.Text.ToString() + ";UID=" + textBox1.Text + ";pwd=" + textBox2.Text + ";";
}
SqlConnection Conexion = new SqlConnection(ConStr);
Conexion.Open();
label9.Visible = false;
panel2.Visible = false;
button2.Visible = true;
panel1.Visible = true;
groupBox1.Visible = true;
DataTable tblDatabases = Conexion.GetSchema("Databases");

for (int i = 0; i <= tblDatabases.Rows.Count - 1; i++)
{
comboBox2.Items.Add(tblDatabases.Rows[i][0].ToString());
}
Conexion.Close();

This is code from earlier post.
Now Lets see the Code on SelectedIndex Change event of Database Combo (Combobox2).
private void comboBox2_SelectedIndexChanged(object sender, EventArgs e)
{
comboBox3.Items.Clear();
SqlConnection conx = new SqlConnection(ConStr + "Database ="+comboBox2.Text.ToString()+";");
conx.Open();
DataTable tblTables = conx.GetSchema("Tables");
for (int i = 0; i <= tblTables.Rows.Count - 1; i++)
{
comboBox3.Items.Add(tblTables.Rows[i][2].ToString());
}
conx.Close();
}
Here we are creating Connection String Everytime, because, It is changing every-time. Now this code will list all the Tables inside Database in Table Combo (combobox3): Code:
private void comboBox3_SelectedIndexChanged(object sender, EventArgs e)
{
comboBox4.Items.Clear();
SqlConnection conx = new SqlConnection(ConStr + "Database =" + comboBox2.Text.ToString() + ";");
conx.Open();
string tableName = comboBox3.SelectedItem.ToString();
SqlDataAdapter adp = new SqlDataAdapter("select * from INFORMATION_SCHEMA.COLUMNS where TABLE_NAME = '"+comboBox3.SelectedItem.ToString()+"'",conx);
DataTable tblColumns = new DataTable();
adp.Fill(tblColumns);
for (int i = 0; i <= tblColumns.Rows.Count - 1; i++)
{
comboBox4.Items.Add(tblColumns.Rows[i][3].ToString());
}
conx.Close();
}

Now above code will make all Columns of Selected table from database.
Now Directly move to Keyword TextBox textchange event which will load data as you type.
private void textBox3_TextChanged(object sender, EventArgs e)
{
string QueryCon = ConStr;
if (comboBox5.Text.ToString() == "like")
{
QueryStr = "SELECT * FROM " + comboBox3.Text.ToString() + " WHERE " + comboBox4.Text.ToString() + " " + comboBox5.Text.ToString() + " '%" + textBox3.Text + "%'";
}
else
{
QueryStr = "SELECT * FROM " + comboBox3.Text.ToString() + " WHERE " + comboBox4.Text.ToString() + " " + comboBox5.Text.ToString() + " '" + textBox3.Text + "'";
}
TxtQueryBox.Text = ConStr + "Database=" + comboBox2.Text.ToString() + ";"+"\n" + QueryStr;
SqlDataAdapter adp = new SqlDataAdapter(QueryStr, ConStr+"Database="+comboBox2.Text.ToString()+";");
DataSet ds = new DataSet();
adp.Fill(ds);
dataGridView1.DataSource = ds.Tables[0];
}

This will load data in GridView automatically. Lets see a snapshot once again with Result.
All the Best, Enjoy....
Read More

Tuesday, 9 October 2012

// // 1 comment

List All SQL Server Instances in Combo (Windows Form)


Hi,

I was checking my Old Projects and Like to share a simple example with. Why not to create a SQL Management Application.

How we would do this? What is our objective?

Lets be clear.
We will List All SQL Server Instances available in Network into Application.
Then We will connect to Server using Windows Authentication or SQL Server Authentication.
After successfull authentication ,
We will list all databases in Instance.
After Database, we will List All Tables in Database,
After Database , we will list All Columns in Selected table.
We will place a Create button next to Database, Table list box also.
After selecting a Column, we provided a Filter (operator) and parameters in box.
Which will fetch data and display in DataGridView.

First we Designed a Following Screen.


In Servers List we have to Load All List of Servers and Connect. We have Options for Username and Password and also a Checkbox for Integrated Security (Windows Authentication).
Lets See the Code in Form Load.
Namespace to Include:

using System.Data.Sql;
using System.Data.SqlClient;

Now Form_Load Event Code

private void Form1_Load(object sender, EventArgs e)
{
panel1.Visible = false;
groupBox1.Visible = false;
label9.Visible = true;
label9.TextAlign = ContentAlignment.MiddleCenter;
SqlDataSourceEnumerator SerInstances = SqlDataSourceEnumerator.Instance;
DataTable SerNames = SerInstances.GetDataSources();
for (int i = 0; i <= SerNames.Rows.Count - 1; i++)
{
comboBox1.Items.Add(SerNames.Rows[i][0].ToString()+"\\"+SerNames.Rows[i][1].ToString());
}
}

Description of Above Code: We have placed rest design in Panel and Groupbox so we set that invisible on Form Load. Please Make a Conncetion First.. is Label9 and we set is Visible and aligned. Now main task is to List Sql Servers on Network. For this we used SqlDataSourceEnumerator class. In Next Line we take a DataTable and stored ServerInstances into that. Rest is Simple, We added all items into Listbox. Column 0 contains Machine name and Column 1 contains Instance Name. So we combined that at the Time of Adding to ComboBox Control. Now Click the Connect Button:

private void button1_Click(object sender, EventArgs e)
{
if (checkBox1.Checked == true && textBox1.Text.Trim().Length > 0)
{
MessageBox.Show("Please Uncheck Integrated Security or Clear UserName!", this.Text + " - Error", MessageBoxButtons.OK, MessageBoxIcon.Error);
}
else if (checkBox1.Checked == false && textBox1.Text.Trim().Length == 0)
{
MessageBox.Show("Please Check Integrated Security or Enter UserName!", this.Text + " - Error", MessageBoxButtons.OK, MessageBoxIcon.Error);
}

else if (textBox1.Text.Trim().Length > 0 && textBox2.Text.Trim().Length == 0)
{
errorProvider1.SetError(textBox2, "Please enter password for Username = " + textBox1.Text + "!");
}
else if (comboBox1.Text.Trim().Length == 0)
{
MessageBox.Show("Please select Server from List. If You can not see any Instance in Servers Combobox, Contact your Network Administrator!", this.Text + " - Message", MessageBoxButtons.OK, MessageBoxIcon.Asterisk);
}
else
{
errorProvider1.Clear();
if (MessageBox.Show("Connection Successfull!, You are Now Connected to Server: " + comboBox1.Text.ToString() + "!", this.Text + " - Alert", MessageBoxButtons.OK, MessageBoxIcon.Information) == DialogResult.OK)
{
comboBox2.Items.Clear();
if (checkBox1.Checked == true)
{
ConStr = "Data Source = " + comboBox1.Text.ToString() + ";Integrated Security = true;";
}
else
{
ConStr = "Data Source = " + comboBox1.Text.ToString() + ";UID=" + textBox1.Text + ";pwd=" + textBox2.Text + ";";
}
SqlConnection Conexion = new SqlConnection(ConStr);
Conexion.Open();
label9.Visible = false;
panel2.Visible = false;
button2.Visible = true;
panel1.Visible = true;
groupBox1.Visible = true;
DataTable tblDatabases = Conexion.GetSchema("Databases");

for (int i = 0; i <= tblDatabases.Rows.Count - 1; i++)
{
comboBox2.Items.Add(tblDatabases.Rows[i][0].ToString());
}
Conexion.Close();
}
}
}

Description of Code: We Put some Validation and Message box to make some user friendly environment. After getting Proper Username and password, we make a Connection String and Used Username and password in Connection String. We build a connection, Make Servers List, Username and password and Connect button invisible and Disconnect button Visible. Then First we loaded all Databases of Selected Instance using Connection.GetSchema() method. How it look after connecting.


For now, its your turn to code something for this. I'll be back soon with Rest Part of This Program. Comments are Welcome. Feedback keep the Important Role in Improvement. So Expecting those from you. Happy Learning!

John Bhatt
Glad to Know, Free to Share.....
Read More

Tuesday, 18 September 2012

// // Leave a Comment

File Upload Control with File Type Filter

Hi,

We are going to learn how to upload a File using FileUpload Control in ASP.NET.

ASPX Code

We Placed a FileUpload Control and a button to Click.

<asp:FileUpload ID="FileUpload1" runat="server" />
<asp:Button ID="BtnUpload" runat="server" Text="Upload File" onclick="BtnUpload_Click" />

Back-end Code

Now BtnUpload_Click event in .cs page.
We are going to Upload only Picture (.JPG file or .BMP file).
 
protected void BtnUpload_Click(object sender, EventArgs e)
{
string sSiteFolder = "ResumeFolder";
string sRealPath = Server.MapPath(sSiteFolder);
if (!Directory.Exists(sRealPath))
Directory.CreateDirectory(sRealPath);
string CompletePath = sRealPath + FileUpload1.FileName;
string FileExt = CompletePath.Substring(CompletePath.IndexOf("."));
switch (FileExt)
{
case ".jpg":
FileUpload1.SaveAs(sRealPath + FileUpload1.FileName);
break;
case ".JPG":
FileUpload1.SaveAs(sRealPath + FileUpload1.FileName);
break;
case ".bmp":
FileUpload1.SaveAs(sRealPath + FileUpload1.FileName);
break;
case ".BMP":
FileUpload1.SaveAs(sRealPath + FileUpload1.FileName);
break;
}
}
Enjoy...
John Bhatt
Read More

Wednesday, 12 September 2012

// // Leave a Comment

Pagination with DataList

Hi,
As we know, DataList is the most versatile Data Bound Control available in ASP.NET. Where you can display data as per your need in your required style, direction etc.
But there is some problem also. There is no option to Paginate the Data Loaded in DataList directly. In case we have too many records, we can not display all them in One Page without paginating.

To escape from this situation, Developers move to GridView, which has easy support for Paginating data.

Today, we will learn How to Paginate DataList data in Simple steps.


First create a DataList as per your requirement. I made like below which is quite simple.


Lets place Next and Previous Buttons for Navigation. Code for above design is below:

Code in ASPX Page (Design)

<asp:DataList ID="DataList1" runat="server" Height="194px" Width="174px"
oneditcommand="DataList1_EditCommand"
oncancelcommand="DataList1_CancelCommand"
onupdatecommand="DataList1_UpdateCommand" DataKeyField="eno">
<HeaderTemplate>

<table width="450" border="2">
<tr>
<th>Employee Name </th>
<th>Designation </th>
<th>Salary </th>
<th>
Edit
</th>
</tr>

</HeaderTemplate>
<EditItemTemplate>
<tr>
<td>
<asp:TextBox ID="txtEname" Text='<%#Eval("ename")%>' runat="server" />
</td>
<td>
<asp:TextBox ID="txtJOb" Text='<%#Eval("job")%>' runat="server" />
</td>
<td>
<asp:TextBox ID="txtSal" Text='<%#Eval("sal")%>' runat="server" />
</td>
<td>
<asp:LinkButton ID="lnk2" runat="server" Text="Update" CommandName ="Update" />
</td>
<td>
<asp:LinkButton ID="LinkButton1" runat="server" Text="Cancel"
CommandName ="Cancel" />
</td>
</tr>

</EditItemTemplate>
<ItemTemplate>
<tr>
<td><%#Eval("ename")%></td>
<td><%#Eval("job")%></td>
<td><%#Eval("sal")%></td>
<td>
<asp:LinkButton ID="lnk1" CommandName="Edit" Text="Edit !" runat="server" />
</td>
</tr>

</ItemTemplate>

<FooterTemplate>
</table>
</FooterTemplate>
</asp:DataList>
<br />
<table class="style1">
<tr>
<td class="style2">
<asp:LinkButton ID="LinkButton2" runat="server" onclick="LinkButton2_Click">Next</asp:LinkButton>
</td>
<td>
<asp:LinkButton ID="LinkButton3" runat="server" onclick="LinkButton3_Click">Previous</asp:LinkButton>
</td>
</tr>
</table>


Now Lets to to Backend. ASPX.CS Page (Code Behind):


protected void Page_Load(object sender, EventArgs e)
{
if (!IsPostBack)
{
CurrentPageIndex = 0;
showData();
}
}
int pg = 0;
void showData()
{
PagedDataSource pgd = new PagedDataSource();
SqlDataAdapter da = new SqlDataAdapter("select * from emp", "Data Source=.\\SQLDB;Database=Test1;Integrated Security=True");
DataSet ds = new DataSet();
da.Fill(ds);

pgd.DataSource = ds.Tables[0].DefaultView;
pgd.CurrentPageIndex = CurrentPageIndex ;
pgd.AllowPaging = true;
pgd.PageSize = 5;

LinkButton2.Enabled = !(pgd.IsLastPage);
LinkButton3.Enabled = !(pgd.IsFirstPage);


DataList1.DataSource = pgd;
DataList1.DataBind();

}

protected void DataList1_EditCommand(object source, DataListCommandEventArgs e)
{
DataList1.EditItemIndex = e.Item.ItemIndex;
showData();
}
protected void DataList1_CancelCommand(object source, DataListCommandEventArgs e)
{
DataList1.EditItemIndex = -1;
showData();
}
protected void DataList1_UpdateCommand(object source, DataListCommandEventArgs e)
{

}

public int CurrentPageIndex
{
get
{
if (ViewState["pg"] == null)
return 0;
else
return Convert.ToInt16(ViewState["pg"]);
}
set
{
ViewState["pg"] = value;
}
}

protected void LinkButton2_Click(object sender, EventArgs e) {
CurrentPageIndex++;
showData();
}
protected void LinkButton3_Click(object sender, EventArgs e)
{
CurrentPageIndex--;
showData();
}


Now Let me Describe things happened in above code:


Move to showData() function.


We created a new object of PagedDataSource. Paged data source as name stands clear, paginated data.


Now we wrote Query, Passed in Adapter, Filled DataSet which should be all clear, because it was Basic Task in ADO.NET. Now we gave it CurrentPageIndex. means where is page now.


For this, just look below to a class CurrentPageIndex which is returning value of CurentPageIndex =0 if page is beling Loaded. To check whether page is loaded or postback, we take help of ViewState. If ViewState["pg"] == null, On Page load this will be null because it is just being initiated. On Postback it will pass the Int value stored in it to CurrentPageIndex.


We set Pagination in PagedDataSource true and Define Page size of 5 records per page.


Now Passed PagedDataSource object as Datasource of Datalist.


Now Linkbutton click events, We increased and Decreased value of CurrentPageIndex.


Hope this must be helpful to you. In case of Any problem, correction in code and help, feel free to comment below.


John Bhatt


Glad to Know, Free to Share.....


http://www.johnbhatt.com


Read More

Wednesday, 29 August 2012

// // Leave a Comment

Implement Same WebMethod for AutoComplete in Multiple Textbox

Hi,


While Answering a question at Forum, I wrote this post.


Suppose We have Multiple Textbox in Same Page and we want to Implement AutoSuggest/AutoComplete feature in All Textbox and of same type. Suppose Multiple Google Search Boxes.


For that case, we have separate Textboxs, Separate AutoComplete Extenders and Separate Methods. We are trying to Consume same PageMethod in All Textbox.


Front End Code:

Product One:


DelimiterCharacters="" Enabled="True" ServiceMethod="GetProducts" MinimumPrefixLength="2"
ServicePath="" TargetControlID="TextBox1" UseContextKey="True">

Product Two:


DelimiterCharacters="" Enabled="True" ServicePath="" TargetControlID="TextBox2"
ServiceMethod="GetProducts" MinimumPrefixLength="2" UseContextKey="True">

Product Three:


DelimiterCharacters="" Enabled="True" ServicePath="" TargetControlID="TextBox3"
ServiceMethod="GetProducts" MinimumPrefixLength="2" UseContextKey="True">


BackEnd Code:


[System.Web.Services.WebMethodAttribute(), System.Web.Script.Services.ScriptMethodAttribute()]
public static string[] GetProducts(string prefixText, int count, string contextKey)
{
SqlConnection con = new SqlConnection(ConfigurationManager.ConnectionStrings["ConToStore"].ConnectionString);
SqlDataAdapter adp = new SqlDataAdapter("Select * from Products where UnitsInStock>0 and ProductName like '%" + prefixText + "%'", con);
DataSet ds = new DataSet();
adp.Fill(ds);
string[] Products = new string[ds.Tables[0].Rows.Count];
for (int j = 0; j <= ds.Tables[0].Rows.Count - 1; j++)
{
Products.SetValue(ds.Tables[0].Rows[j][1].ToString(), j);
}
return Products;
}
Lets Look at the Output.

Hope this will be Helpful.
John Bhatt
Glad to Know, Free to Share.....
http://www.johnbhatt.com

Read More

Saturday, 18 August 2012

// // Leave a Comment

DropDownList (Country-State-District-City)

How to Make a Complete Dropdown and Prevent Inserting Dummy Data from Form.
Disable other Controls when Clicked back to Parent Control:
Drop Down Sequence:
OnLoad
Load Country
On-Change
Load State according to Country
On-Change
Load Dists in State
On-Change
List Cities in Dist.

Code:
protected void ddlCountry_SelectedIndexChanged(object sender, EventArgs e)
{
ddlState.DataSource = res.States(Convert.ToInt16(ddlCountry.SelectedValue));
ddlState.DataTextField = "StateName";
ddlState.DataValueField = "StateID";
ddlState.DataBind();
ddlState.Items.Insert(0, "Select");
ddlDist.Enabled = false;
ddlCity.Enabled = false;
}

protected void ddlState_SelectedIndexChanged(object sender, EventArgs e)
{
ddlDist.DataSource = res.Districts(Convert.ToInt16(ddlState.SelectedValue));
ddlDist.DataTextField = "DistName";
ddlDist.DataValueField = "DistID";
ddlDist.DataBind();
ddlDist.Items.Insert(0, "Select");
ddlDist.Enabled = true;
ddlCity.Enabled = false;
}

protected void ddlDist_SelectedIndexChanged(object sender, EventArgs e)
{
ddlCity.DataSource = res.Cities(Convert.ToInt16(ddlDist.SelectedValue));
ddlCity.DataTextField = "CityName";
ddlCity.DataValueField = "CityID";
ddlCity.DataBind();
ddlCity.Items.Insert(0, "Select");
ddlCity.Enabled = true;
}
John Bhatt
Glad to Know, Free to Share.....
http://www.johnbhatt.com
Read More

Saturday, 7 July 2012

// // Leave a Comment

State Management in ASP.NET part-1 (Cookies)

Hi,

I am Back with State Management Series.

In this post we are going to Talk about Cookies. After Reading this, you must be able to do following things:
  • Create Cookie
  • Access Cookie
  • Can answer Some Basic Q & A about Cookie
What is Need of Cookie?

Cookies are Required to Store Temporary data in Users system which may be Required during Session or after Session.

How Many Type of Cookie are there?
Cookies are generally of Two Type. Session wide or Persistent. Sessional cookies Expire as soon as User Closed Session means Browser. Persistent cookies expire after Defined Time. This can be Defined at the Time of Creation.

Who Make Cookies?

Cookie is always made by Application (Server) in Users/ Clients Browser and stored in Hard Disk of User. These are used to store Users Customized Appearance, other Values , Login Time etc for future Retrieval so that website can server him better.

Limitations of Cookie?

Cookies are open Invitations to Hackers.

Cookies can only store Little and Only String Type Data.


Now Lets Learn with Coding. First We will Create a Cookie named myCookie and Solve Earlier Problem with the Help of Cookie.
Now Code is Like Below:
protected void Page_Load(object sender, EventArgs e)
{

}
int x; // Made a Variable with Datatype Int for Future Use
HttpCookie myCookie; // Defined a Cookie named myCookie.
protected void Button1_Click(object sender, EventArgs e)
{
x = Convert.ToInt32(TextBox1.Text); // Converted textbox Value which we earlier Did.
myCookie = new HttpCookie("txtValue"); // Assigned Variable myCookie.
myCookie.Value = Convert.ToString(x); // Value assigned to myCookie.
Response.Cookies.Add(myCookie); //This Simple Made a Cookie that will Expire in Session End.
myCookie.Expires = DateTime.Now.AddMinutes(15); // We made is Persistent and stored it for Next 15 minutes.

}
protected void Button2_Click(object sender, EventArgs e)
{

HttpCookie storedCook = Request.Cookies["txtValue"]; // Requested from Server for Cookie
if (storedCook != null)
x = Convert.ToInt32(storedCook.Value); // Converted to Integer again.
TextBox1.Text = Convert.ToString(x * x); // Now Printed Value in Textbox.
}
Now Check....

Don't forget to add me on Google+, +John Bhatt .
Read More
// // Leave a Comment

State Management in ASP.NET

Hi Everybody,


I am once back with a blog/article/tutorial whatever you think/call it.


State Management :


HTTP Protocol is State less protocol. In Simple Language, Each and Every time We send a request to server, this is New to server.

To Understand this ,Suppose you took One Textbox and Two Buttons like in Image below:


Now, the task is To Enter Number in Textbox and Click in First Button to Convert to Integer format and then Click Second button to Print Square of Converted Integer in Textbox. What will you do. Lets look at code what I did here.

protected void Page_Load(object sender, EventArgs e)
{

}
int x;

protected void Button1_Click(object sender, EventArgs e)
{
x = Convert.ToInt32(TextBox1.Text);
}
protected void Button2_Click(object sender, EventArgs e)
{
TextBox1.Text = Convert.ToString(x * x);
}


Now what would I get Result on Second Button Click event. Textbox Result will be 0 even I have entered any number. Don't agree, try this at home.


This is Because, at the time of Button2 Click new request is send to server and Initial Value of X is picked from server which is 0.


To Prevent the Loose of Data each time we send request to server, ASP.NET have implemented concept of State Management.

State Management is divided into 2 parts according to Functionality.

1) User Based State Management
  • Cookies
  • QueryStrings
  • ViewState
  • Controls
  • Hidden Fields
2) Server Based State Management
  • Session
  • Application
  • Profile


I am going to Describe all these States step by step in Different Posts.

All the Series has been posted on DotNetSpider at below Link Resources > Keep Reading.
Read More

Friday, 22 June 2012

// // Leave a Comment

Export to Excel from DataGridView in ASP.NET

Hi,
We are going to learn how to Export GridView data to Microsoft Excel at Runtime.

We are using: ASP.NET Framework 4.0, Visual Studio 2010, SQL Server 2008, C#, XHTML 4.01

 Code for ASPX Page (Front-End) Adding GridView and Columns:

&LTasp:GridView ID="gvPros" runat="server" AutoGenerateColumns="false" Width="664px" Font-Names="Calibri"
HeaderStyle-Font-Bold="true" AlternatingRowStyle-BackColor="LightGoldenrodYellow" EmptyDataText="No Records Found. Try again by Changing Filter Options."&GT
&LTColumns&GT
&LTasp:TemplateField HeaderText="Party Name"&GT
&LTItemTemplate&GT
&LTasp:Label ID="lblPartyName" runat="server" Text='&LT%#Eval("PartyName")%&GT'&GT&LT/asp:Label&GT
&LT/ItemTemplate&GT
&LT/asp:TemplateField&GT
&LT/Columns&GT
&LTColumns&GT
&LTasp:TemplateField HeaderText="Mode"&GT
&LTItemTemplate&GT
&LTasp:Label ID="lblFreight" runat="server" Text='&LT%#Eval("Division")%&GT'&GT&LT/asp:Label&GT
&LT/ItemTemplate&GT
&LT/asp:TemplateField&GT
&LT/Columns&GT
&LTColumns&GT
&LTasp:TemplateField HeaderText="Month"&GT
&LTItemTemplate&GT
&LTasp:Label ID="lblMonthName" runat="server" Text='&LT%#Eval("ProMonth")%&GT'&GT&LT/asp:Label&GT
&LT/ItemTemplate&GT
&LT/asp:TemplateField&GT
&LT/Columns&GT
&LTColumns&GT
&LTasp:TemplateField HeaderText="Total Box"&GT
&LTItemTemplate&GT
&LTasp:Label ID="lblTotalBox" runat="server" Text='&LT%#Eval("ProPkg")%&GT'&GT&LT/asp:Label&GT
&LT/ItemTemplate&GT
&LT/asp:TemplateField&GT
&LT/Columns&GT
&LTColumns&GT
&LTasp:TemplateField HeaderText="Actual Weight"&GT
&LTItemTemplate&GT
&LTasp:Label ID="lblPartyName" runat="server" Text='&LT%#Eval("ProActWt")%&GT'&GT&LT/asp:Label&GT
&LT/ItemTemplate&GT
&LT/asp:TemplateField&GT
&LT/Columns&GT
&LTColumns&GT
&LTasp:TemplateField HeaderText="Charged Wt"&GT
&LTItemTemplate&GT
&LTasp:Label ID="lblChWt" runat="server" Text='&LT%#Eval("ProChWt")%&GT'&GT&LT/asp:Label&GT
&LT/ItemTemplate&GT
&LT/asp:TemplateField&GT
&LT/Columns&GT
&LTColumns&GT
&LTasp:TemplateField HeaderText="Freight"&GT
&LTItemTemplate&GT
&LTasp:Label ID="lblFreight" runat="server" Text='&LT%#Eval("ProFreight")%&GT'&GT&LT/asp:Label&GT
&LT/ItemTemplate&GT
&LT/asp:TemplateField&GT
&LT/Columns&GT
&LT/asp:GridView&GT

Adding Export Link
 &LTasp:LinkButton ID="lnkExport" runat="server" Text="Export to Excel" onclick="lnkExport_Click"&GT&LT/asp:LinkButton&GT

Now Code for ASPX.CS Page (BackEnd):


Namespaces :
using System;
using System.Collections.Generic;
using System.Linq;
using System.Web;
using System.Web.UI;
using System.Web.UI.WebControls;
using System.Data;
using System.Data.SqlClient;
using System.Configuration;
using System.Drawing;
using System.IO;
using System.Text;
using System.Web.Security;
using System.Web.UI.HtmlControls;
using System.Web.UI.WebControls.WebParts;

Data Binding and Export LinkButton Click Event:
void GVProsFill()
{
string Query = "Select * from Parties, Prosperity where Parties.PartyID=Prosperity.ProParty";
SqlConnection con = new SqlConnection(ConfigurationManager.ConnectionStrings["ConToSEPL"].ConnectionString);
SqlDataAdapter adp = new SqlDataAdapter(Query, con);
DataSet ds = new DataSet();
adp.Fill(ds);
gvPros.DataSource = ds.Tables[0];
gvPros.DataBind();
}

//You have to add an another Event for Export to work properly:
public override void VerifyRenderingInServerForm(Control control)
{
// Can Leave This Blank.
}

protected void lnkExport_Click(object sender, EventArgs e)
{
Response.ClearContent();
Response.Buffer = true;
Response.AddHeader("content-disposition", string.Format("attachment; filename={0}", "Prosperity.xls"));
Response.ContentType = "application/ms-excel";
StringWriter sw = new StringWriter();
HtmlTextWriter htw = new HtmlTextWriter(sw);
gvPros.AllowPaging = false;
GVProsFill();
gvPros.HeaderRow.Style.Add("background-color", "#FFFFFF");
for (int a = 0; a < gvPros.HeaderRow.Cells.Count; a++)
{
gvPros.HeaderRow.Cells[a].Style.Add("background-color", "#507CD1");
}
int j = 1;
foreach (GridViewRow gvrow in gvPros.Rows)
{
gvrow.BackColor = Color.White;
if (j <= gvPros.Rows.Count)
{
if (j % 2 != 0)
{
for (int k = 0; k < gvrow.Cells.Count; k++)
{
gvrow.Cells[k].Style.Add("background-color", "#EFF3FB");
}
}
}
j++;
}
gvPros.RenderControl(htw);
Response.Write(sw.ToString());
Response.End();
}

I will be waiting to Listen from you....
Read More

Sunday, 3 June 2012

// // Leave a Comment

What is C# and what software are required to run a C# program?

C# 

C# (pronounced see sharp) is a Object Oriented, Component Oriented and Most Advance Programming Language from Microsoft. 
C# code is to be compiled before it Run. You can use C# to Create Windows Applications as well Web Applications. Software you see in General Life are Mostly powered by C#, because if Its Simplicity and Advance Features. There is nothing impossible to do with C#. 


Now as I told earlier, C# source code must be compiled before it to Run. Even If you are creating Windows Application (Desktop based) or Web application (Browser based), you must compile the code. 
You have following Software to to the Job of C# Compiler which are called IDE here and Compiling Task is called Implementation. 
Main is Microsoft Visual C#. This is built in tool in Microsoft Visual Studio Express (Free). 
Mono Project provides Open Source IDE for C# named MonoDevelop.
SharpDevelop is another Open Source Tool.


There are few more applications for Linux and Mac which does the same job as in Windows.


Read More